Showing posts with label auto. Show all posts
Showing posts with label auto. Show all posts
Friday, September 19, 2014
Build a Auto Anti Hijack Alarm Circuit Diagram
This Auto Anti-Hijack Alarm Circuit Diagram was designed primarily for the situation where a hijacker forces the driver from the vehicle. If a door is opened while the ignition is switched on - the circuit will trip. After a few minutes delay - when the thief is at a safe distance - the Siren will sound.
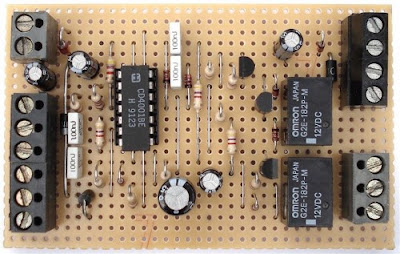
Where it differs from the first two alarms - is in what happens next. Im obliged to Victor Montanez from the USA who suggested that the engine cut-out should not operate - until the vehicle comes to a stop. That way - the engine will not fail suddenly or unexpectedly. And the hijacker will retain control.
I havent been able to implement Victors excellent suggestion completely - because I couldnt think of a simple, reliable and universally applicable way of sensing when the vehicle has come to a stop.
Instead - I have postponed engine failure until the ignition is switched off. Once the thief turns off the ignition - the engine will not re-start. Clearly - there is no certainty as to when this will occur. But I think it will occur sooner rather than later. Because theres a strong possibility that the hijacker will turn off the ignition - in an attempt to silence the siren.
Auto Anti-Hijack Alarm Circuit Diagram

As well as acting as a Hijack Alarm - this circuit offers some added protection. Like the Enhanced Hijack Alarm - it incorporates Jeff Chias suggestion. That is - every time the ignition is switched on - the alarm will trip. So it will protect the vehicle whenever you leave it unattended with the ignition switched off - even overnight in your driveway.
Importance
Before fitting this or any other engine cut-out to your vehicle - carefully consider both the safety implications of its possible failure - and the legal consequences of installing a device that could cause an accident. If you decide to proceed - you will need to use the highest standards of materials and workmanship.
Notes
Youre going to trip this alarm unintentionally. When you do - the LED will light and the Buzzer will give a short beep. The length of the beep is determined by C4. Its purpose is to alert you to the need to push the reset button. When you push the button - the LED will switch-off. Its purpose is to reassure you that the alarm has in fact reset.
If the reset button is not pressed then - about 3 minutes later - both the Siren and the Buzzer will sound continuously. The length of the delay is set by R8 & C5. For extra effect - fit a second siren inside the vehicle. With enough noise going on - you may feel that its unnecessary to fit the engine cut-out. In which case - you can leave out C7, D8, R12, R13, Ty1 & Ry2.
When the ignition is switched on - C3 & R4 are responsible for tripping the alarm. By taking pin 1 low momentarily - they simulate the opening of a door. If you dont want the alarm to trip every time you turn on the ignition - simply leave out C3 & R4.
Because the voltage on C3 may be reversed - the capacitor needs to be non-polarized. But connecting two regular 22uF capacitors back to back as shown - will work just as well. Because non-polarized capacitors are not widely available - the prototype was built using two polarized capacitors.
To reset the circuit you must - EITHER turn off the ignition - OR close all of the doors - before you press the reset button. While BOTH the ignition is on - AND a door remains open - the circuit will NOT reset.
The reset button carries virtually no current - so any small normally-open switch will do. Eric Vandel from Canada suggests using a reed-switch hidden behind (say) the dash - and operated by a magnet. I think this is an excellent idea. As Eric said in his email: - "... that should keep any thief guessing for a while."
Veroboard Layout

How you prevent the engine from starting is up to you. It should happen when Ry2 de-energizes. The contacts of Ry2 are too small to do the job themselves. So use them to switch the coil of a larger relay. Remember that the relay must be suitable for the current its required to carry. Choose one specifically designed for automobiles - it will be protected against the elements - and will give the best long-term reliability. You dont want it to let you down on a cold wet night - or worse still - in fast moving traffic!!! Remember also that you must fit a 1N4001 diode across YOUR relays coil - to prevent damage to the Cmos IC
YOUR relay should drop-out when Ry2 de-energizes. Wire YOUR relay so that when it drops-out the engine will not start. Because turning-off the ignition will cause both Ry2 and YOUR relay to de-energize - the standby current will be low - and the engine will be disabled while the vehicle is parked.
The circuit board must be protected from the elements. Dampness or condensation will cause malfunction. Fit a 1-amp in-line fuse AS CLOSE AS POSSIBLE to your power source. This is VERY IMPORTANT. The fuse is there to protect the wiring - not the components on the circuit board. Please note that I am UNABLE to help any further with either the choice of a suitable relay - or with advice on installation.
Both the Siren and the Buzzer will go on sounding until the alarm is reset. The circuit is designed to use an electronic Siren drawing up to about 500mA. Its not usually a good idea to use the vehicles own Horn because it can be easily located and disconnected. However, if you choose to use the Horn, remember that Ry1 is too small to carry the necessary current. Connect the coil of a suitably rated relay to the "Siren" output. This can then be used to sound the Horn.

Wednesday, July 3, 2013
Auto Changeover from Generator to Mains Supply
Because of energy crisis Load shedding may be a common problem in several countries.. Sudden power fluctuations, surge and high voltage may spoil sophisticated household appliances like TV, VCR, VCP and music system. This circuit provides protection against these problems and automatically changes the power supply from Generator output to mains supply and also switches off the generator.
Circuit descriptions
This circuit is self explanatory. When lines supply voltage crosses the preset level, Zener diode ZD4 break down and thus transistor T2 conducts, T3 does not conduct, causing the relay to de-energise. Voltage surge at the time of power resumption is protected by the delay circuit around transistor T1.
All the portable petrol and kerosene generators have a connection from CDI. To stop the engine of the generator-set, this connection is to be grounded momentarily (through the switch). This lead is to be connected with the ground through the N/C point of the relay.
Auto Changeover from Generator to Mains Supply Circuit Diagram

Instead of the one transformer, two transformers are used in series to ensure better life of the unit. Value of capacitor C2 can be increased or decreased for the variation of delay time. A negative feedback resistance, R6 (15 K-ohm to 100 k-ohm) can be incorporated between transistor T3 and T4 to overcome the damage that could be caused by voltage fluctuations.
Parts List:
Resistors (all ¼-watt, ± 5% Carbon)
R1 = 10 Ω
R2 = 1 KΩ
R3 = 820 Ω
R4 = 57 KΩ
R5 = 47 Ω
R6 = (15 KΩ to 100 KΩ)
Capacitors
C1 = 100 µF/25V
C2 = 1000 µF/12V
C3 = 100 µF/18V
Semiconductors
T1 = BC147
T2, T3 = SL100
D1, D2 = 1N4001
D3 = 1N4007
ZD1 = 5.6V/400mW
ZD2 = 7.8V/400mW
Miscellaneous
X1, X2 = 230V AC primary to 12 V, 500mA secondary transformers
RL1 = 12V/450 Ω relay
Circuit descriptions
This circuit is self explanatory. When lines supply voltage crosses the preset level, Zener diode ZD4 break down and thus transistor T2 conducts, T3 does not conduct, causing the relay to de-energise. Voltage surge at the time of power resumption is protected by the delay circuit around transistor T1.
All the portable petrol and kerosene generators have a connection from CDI. To stop the engine of the generator-set, this connection is to be grounded momentarily (through the switch). This lead is to be connected with the ground through the N/C point of the relay.
Auto Changeover from Generator to Mains Supply Circuit Diagram
Instead of the one transformer, two transformers are used in series to ensure better life of the unit. Value of capacitor C2 can be increased or decreased for the variation of delay time. A negative feedback resistance, R6 (15 K-ohm to 100 k-ohm) can be incorporated between transistor T3 and T4 to overcome the damage that could be caused by voltage fluctuations.
Parts List:
Resistors (all ¼-watt, ± 5% Carbon)
R1 = 10 Ω
R2 = 1 KΩ
R3 = 820 Ω
R4 = 57 KΩ
R5 = 47 Ω
R6 = (15 KΩ to 100 KΩ)
Capacitors
C1 = 100 µF/25V
C2 = 1000 µF/12V
C3 = 100 µF/18V
Semiconductors
T1 = BC147
T2, T3 = SL100
D1, D2 = 1N4001
D3 = 1N4007
ZD1 = 5.6V/400mW
ZD2 = 7.8V/400mW
Miscellaneous
X1, X2 = 230V AC primary to 12 V, 500mA secondary transformers
RL1 = 12V/450 Ω relay
Monday, June 3, 2013
Yukon 2500 Fuel Pump Wiring Harnessairtex Fueldelphi Auto

Jeep Grand Cherokee Radio Adaptor Wiring Harness Circuit Schematic.

Honda Accord Air Conditioner Wiring Harness.

Yukon Xl 2500 Fuel Pump Wiring Harness Airtex Fuel Delphi At Auto.

Lancer Evolution Wiring Diagram Harness.

Posts Datsun 510 Wiring Diagram And Cable Harness Schematic 2004.

Wiring Harness And Cable Connection Diagram Here Source Manual.

Wiring Harness Connectors Wiring Harness Connectors Manufacturer.

Hid Xenon Bulb D2s D2r D2c Wiring Harness Socket Adapters 2080.

Chevy Truck Underhood Wiring Diagrams Chuck S Chevy Truck Pages Com.

Engine Wiring Diagram 4 Automotive Wire Harness Prestolite Wire.
Wednesday, May 29, 2013
Choosing the Right Amplifier for your Auto Sound System
Finding the best amplifier for your auto sound system can be a lot easier if you take the time ahead of time to learn what you need and what will work best with the sound system youve selected for your car, truck, or SUV. It helps to understand what an amplifier does in order to purchase the one that will best suit your needs. An amplifier takes a small sound, adds a little boost of its own, and then turns it into a big sound. The more power your amplifier has, the better quality of sound it will provide. An underpowered amplifier will have a thin, tinny sound that is rather unattractive in an auto sound system, or any other sound system for that matter.
You should also take care to remember that the power rating of an amplifier is the maximum power it is capable of expending not the amount that it will regularly use. The RMS rating of an amplifier is a good indication of its power output. One thing that is important to remember is that you should never buy an amplifier based on the maximum output or RMS rating. This number is more often than not incredibly misleading. If a driving, thumping bass beat is important to you then you should make sure that your amplifier has a bass boost button. This button will or switch will give a little bit of a boost to your bass. Its something I can pass on by many bass lovers cannot live without. Not all amplifiers have this so choose wisely and according to your preferences.
When it comes to amplifiers there are essentially four major classes (there are other classes but they are not all that common so I will not dwell on defining them) that represent the quality of sound you should expect from the system.
1) A. This class has a great output of quality sound but wastes huge amounts of energy in the process of creating that wonderful sound.
2) B. This class is slightly better than A as far as it wastes less energy and slightly worse as it produces a somewhat inferior quality of sound.
3) A/B. This resembles either A or B as far as sound and energy waste goes depending on the volume. Lower volumes will utilize the class A qualities of the amplifier while louder volumes are more in keeping with class B.
4) D. This class is primarily decent for producing a good bass sound and little else. The quality of sound and amount of energy wasted are both only moderate and neither are very impressive.
Of course this is the bare bones run through of the very basic amplifier basics. Another thing to note is that many people simply refer to amplifiers as amps rather than saying the entire word. Its slang but its so common that no one will blink if you do it. In fact you are far more likely to get funny looks for calling it an amplifier. Regardless of the small talk an amplifier isnt the end all be all of an auto sound system. It is only important if you feel it is important and many sound systems work splendidly without an extra amplifier to confuse the process and raise the price.
Whenever you decide to buy a new auto sound system for your car, truck, or SUV there is a moment of exhilaration and excitement as this is often a decision youve mulled over for quite a while rather than a spur of the moment decision. This exhilaration is promptly followed by a moment of complete and utter fear, as most of us have no clue what we really need. Hopefully, this has helped you decide whether or not you will need an amplifier and if you will, perhaps you can make a more educated and informed decision as to the type of amp you need.
Sunday, April 7, 2013
Self Installation of Auto Sound System can Save Serious Cash
If you are seriously hoping to save a significant chunk of change when it comes to your auto sound system, you should consider saving on installation. Under ordinary circumstances I urge people to be very, if not overly cautious when it comes to installing your own auto sound systems. The thing is, that some people really are talented when it comes to activities such as this. Beyond talent, some people have frightening skills with electronics and if you are one of those, then by all means consider the money you could save yourself (or the extra money youd have to invest in your system?).
We all know that money doesnt grow on trees and when youve been saving up for quite a while to get the sound system you really want its a serious joy killer to have to wait another month or two in order to save up enough money to cover the cost of the installation of your sound system. If you or someone you know and trust (trust being the operative word in this instance) can do the work, it makes no sense from a fiscal point of view to pay someone else to do it.
That being said, if there are any doubts about your skill or experience you might want to at the very least get a second opinion or price installations in your area to see if it might actually be worth saving a little more. Time is another important issue when it comes to the installation of an auto sound system. It doesnt matter how capable you are of making the installation if you simply lack the time to do it. In cases such as this it would have been just as wise to go ahead and pay someone to make the installation. It makes much more sense to me than having the system sitting in a box for months on end while you wait for the time to get it taken care of.
I am one of those people who firmly believes that time is money. Time lost from work is expensive. This is especially true when the times of 10 or more people are lost. It adds up quickly no matter if you have a small or a large company. Time is also (unfortunately) the one commodity in life that you can never recover. No matter how hard you try you cannot recapture time that has been lost. If you have children you know exactly what Im talking about (particularly if your children are either teens or grown and gone). You cannot recover lost time so make sure you arent wasting your time by trying to install an auto sound system that is beyond your abilities.
Dont fret though. Most of us find that at some point in our lives we are limited by either time or money if not both. If everything was quick and easy we wouldnt really have anything worth working for would we? Consider all your limitations when planning and purchasing your auto sound system and make sure that the system you select falls squarely within your ability to install, your time limit for installation, or your price range for affording to pay for the installation. Whether you decide to do your own installation or have a professional installation of your auto sound system the prize is the superior sound quality you will be able to enjoy.
Subscribe to:
Posts (Atom)